


用vue开发了一个阅读网站,基本功能完成后才想起seo这回事,发现改成服务端渲染(ssr)难度大,改动大。于是四处寻找靠谱方案,最终选定了服务端动态渲染的方案
什么是服务端动态渲染
其实就是通过反向代理服务器识别访问端的User-Agent,如果是正常的UA,则定向到我们的vue打包后目录,如果UA里面带了爬虫标志,则将请求指向到我们新起的一个node服务,在这个node服务里面使用无头浏览器打开该网页,获取到渲染后的的html之后返回给客户端。这样就实现了爬虫能爬取到动态填充内容后的网页,seo也就没问题啦。
关于spa的seo大家可以看下这篇博客 https://markdowner.net/article/73058307795021824,本文的方案也是用的这篇博客的方案四,做了少许改动。
方案选择
常用来做单页面app的seo的无头浏览器有phantomjs和puppeteer,最开始我用的是phantomjs,但是后面发现调试起来时灵时不灵,而且phantomjs也不再维护了,所以改成了使用puppeteer,采用上面提到的博客的博主的方案。
node项目搭建
- 新建一个项目,引用以下包
{
   "bluebird": "^3.7.2",
   "express": "^4.17.3",
   "puppeteer": "^13.4.0",
   "redis": "^3.1.2",
   "request": "^2.88.2"
}
- 新建用于调用redis的工具类js,注意代码中redis的ip、端口、密码替换成你自己的
const redis = require('redis')
const bluebird = require('bluebird')

bluebird.promisifyAll(redis)

const host = '127.0.0.1'
const port = 6379
const password = '123456'

const client = redis.createClient({
    host,
    port,
    password,
    retry_strategy: function(options) {
        if (options.error && options.error.code === "ECONNREFUSED") {
            return new Error("The server refused the connection");
        }
        if (options.total_retry_time > 1000 * 60 * 60) {
            return new Error("Retry time exhausted")
        }
        if (options.attempt > 10) {
            return undefined
        }
        return Math.min(options.attempt * 100, 3000);
    },
})

client.on("error", function(e) {
    console.error('dynamic-render redis error: ', e)
});

const redisClient = {
    client
}
module.exports = redisClient
- 创建用于处理传入的url,并且解析成渲染后的html的js,在get方法里面可以修改redis缓存时间
const puppeteer = require('puppeteer')
const redisClient =  require('./redis/index.js')

async function get(url) {
    const REDIS_KEY = `ssr:${url}`
    const CACHE_TIME = 1800; // 30 分钟缓存
    const CACHE_HTML = await redisClient.client.getAsync(REDIS_KEY)

    if (CACHE_HTML) {
        return { html: CACHE_HTML, ttRenderMs: 0 }
    }
    const start = Date.now()

    const browser = await puppeteer.launch({
        args: ['--no-sandbox', '--disable-setuid-sandbox']
    })

    try {
        const page = await browser.newPage()
        const stylesheetContents = {}

        // 1. Stash the responses of local stylesheets.
        page.on('response', async resp => {
            const responseUrl = resp.url()
            const sameOrigin = new URL(responseUrl).origin === new URL(url).origin
            const isStylesheet = resp.request().resourceType() === 'stylesheet'
            if (sameOrigin && isStylesheet) {
                stylesheetContents[responseUrl] = await resp.text()
            }
        });

        // 2. Load page as normal, waiting for network requests to be idle.
        // networkidle0 waits for the network to be idle (no requests for 500ms).
        await page.goto(url, {waitUntil: 'networkidle0'})
        await page.waitForSelector('#app'); // ensure #app exists in the DOM.

        // 3. Inline the CSS.
        // Replace stylesheets in the page with their equivalent <style>.
        await page.$$eval('link[rel="stylesheet"]', (links, content) => {
            links.forEach(link => {
                const cssText = content[link.href]
                if (cssText) {
                    const style = document.createElement('style')
                    style.textContent = cssText
                    link.replaceWith(style)
                }
            })
        }, stylesheetContents)

        // 4. Get updated serialized HTML of page.
        const html = await page.content() // serialized HTML of page DOM.
        await browser.close()

        const ttRenderMs = Date.now() - start
        await redisClient.client.set(REDIS_KEY, html, 'EX', CACHE_TIME) // cache rendered page.
        return {html, ttRenderMs}
    } catch (err) {
        console.error(err)
        throw new Error('render fail')
    }
}

const ssr = {
    get
};
module.exports = ssr
- 创建node服务相关的js,变量host是需要访问的网站的域名,因为请求从nginx转发过来已经拿不到host了,都是127.0.0.1,所以这里需要按需修改
const express = require('express')
const request = require('request')
const ssr = require('./ssr.js')

const app = express()

const host = 'https://read.luoxx.top'

app.get('/static/*', async (req, res) => {
    request(`${host}${req.url}`).pipe(res)
})

app.get('/manifest.json', async (req, res) => {
    request(`${host}${req.url}`).pipe(res)
})

app.get('/favicon.ico', async (req, res) => {
    request(`${host}${req.url}`).pipe(res)
})

app.get('/logo*', async (req, res) => {
    request(`${host}${req.url}`).pipe(res)
})

app.get('*', async (req, res) => {
    const {html, ttRenderMs} = await ssr.get(`${host}${req.originalUrl}`);
    res.set('Server-Timing', `Prerender;dur=${ttRenderMs};desc="Headless render time (ms)"`)
    return res.status(200).send(html); // Serve prerendered page as response.
})

app.listen(8327, () => console.log('Server started. Press Ctrl + C to quit'))
- 以上代码基本上是从前文提到的博客里面复制过来的,我只是改造了一下以支持node项目。所有代码我都打包上传到了github,需要的可以直接去下载。地址: https://github.com/luoxmc/vue-seo-puppeteer
环境准备(centos)
- 安装redis,主要用于缓存访问页,加快下次访问的访问速度
#安装
yum install redis
#启动
service redis start
修改redis密码,只需修改/etc/redis.conf文件,将 #requirepass foobared 修改为 requirepass 你的密码
修改之后执行service redis restart重启redis
- 安装nginx(已安装可以忽略)
#安装
yum -y instal nginx
#启动
systemctl start nginx
- 配置nginx,yum安装的nginx默认配置文件为/etc/nginx/nginx.conf,配置如下(爬虫访问转发到本机8327端口,非爬虫直接访问资源目录)
location ^~ / {
                if ($http_user_agent ~* "Baiduspider|twitterbot|facebookexternalhit|rogerbot|linkedinbot|embedly|quora link preview|showyoubot|outbrain|pinterest|slackbot|vkShare|W3C_Validator|bingbot|Sosospider|Sogou Pic Spider|Googlebot|360Spider") {
                        proxy_pass  http://127.0.0.1:8327;
                }

                root /opt/webapps/reader_client_8181/;
                index index.html index.htm;
                try_files $uri $uri/ /index.html;
        }
注意nginx配置修改后需要执行systemctl reload nginx使配置生效
- 启动我们的node服务,把项目上传到服务器,cd进入项目目录,npm install之后直接执行node server.js即可启动服务,但是ctrl c服务就停了,推荐使用pm2来启动
#安装
npm install -g pm2
#启动
pm2 start server.js
#停止
pm2 stop server.js
#查看日志
pm2 logs
踩坑
-
redis连接报错,在配置redis地址的时候使用本机redis没问题,但是配置远程redis需要远程的redis开放权限,不然访问不了
在/etc/redis.conf文件中找到bind 127.0.0.1这一行,并注释,重启redis,即可远程访问。 -
puppeteer安装需要下载一个百多兆的chrome,而且网速感人,推荐使用cnpm来安装
#安装cnpm
npm install -g cnpm -registry=https://registry.npm.taobao.org
#install依赖
cnpm install
- 启动各种缺so依赖的报错
error while loading shared libraries: libatk-bridge-2.0.so.0: cannot open shared object file: No such file or directory
error while loading shared libraries: libxkbcommon.so.0: cannot open shared object file: No such file or directory
如上报错,基本上都是因为puppeteer缺少依赖环境。
直接访问这篇博客https://www.cnblogs.com/ilizhu/p/14504049.html
这个里面有详细的各种报错的的解决方案
效果
忙活这么久,效果如何呢,一起来看一下
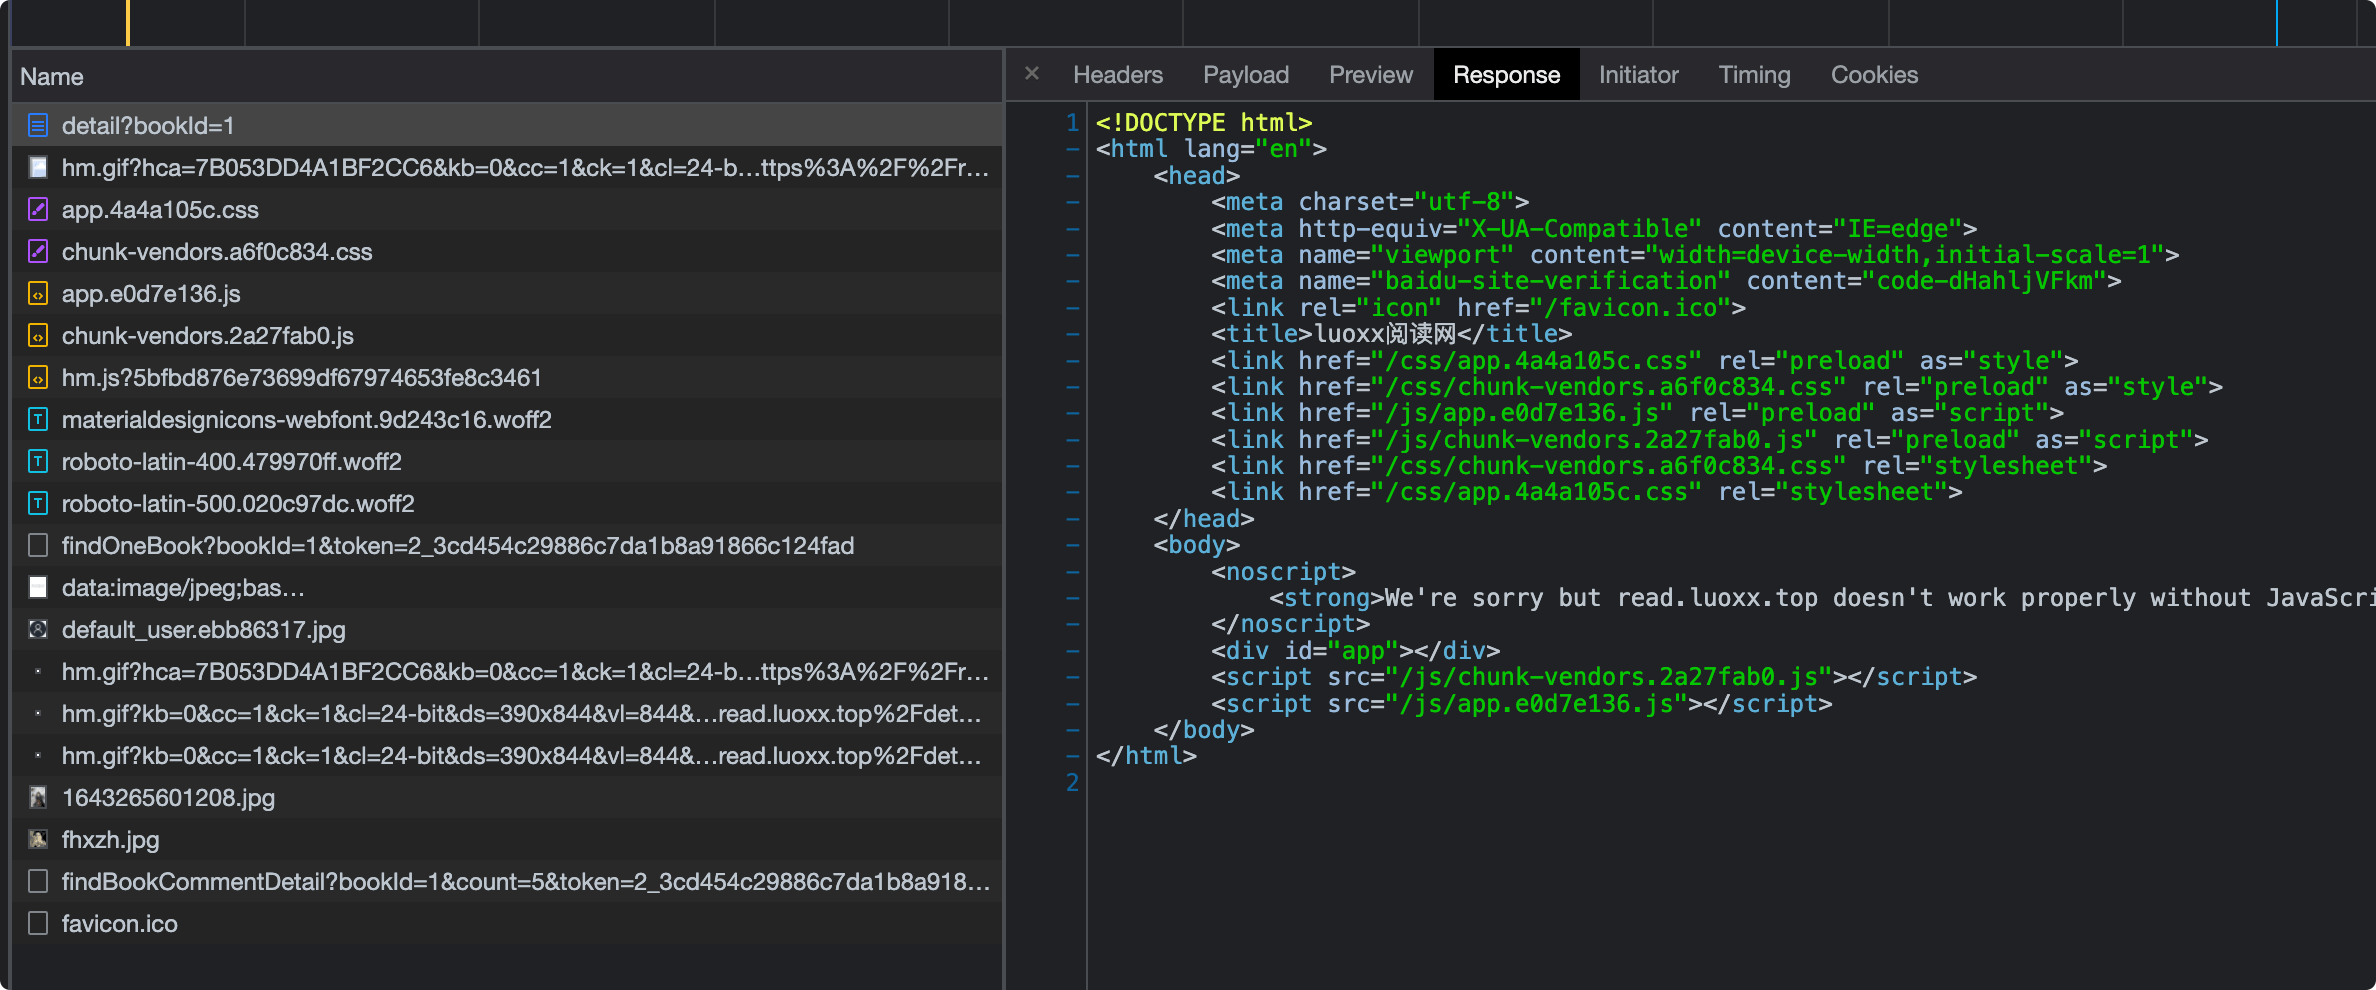
- 直接访问获取到的html结构如下
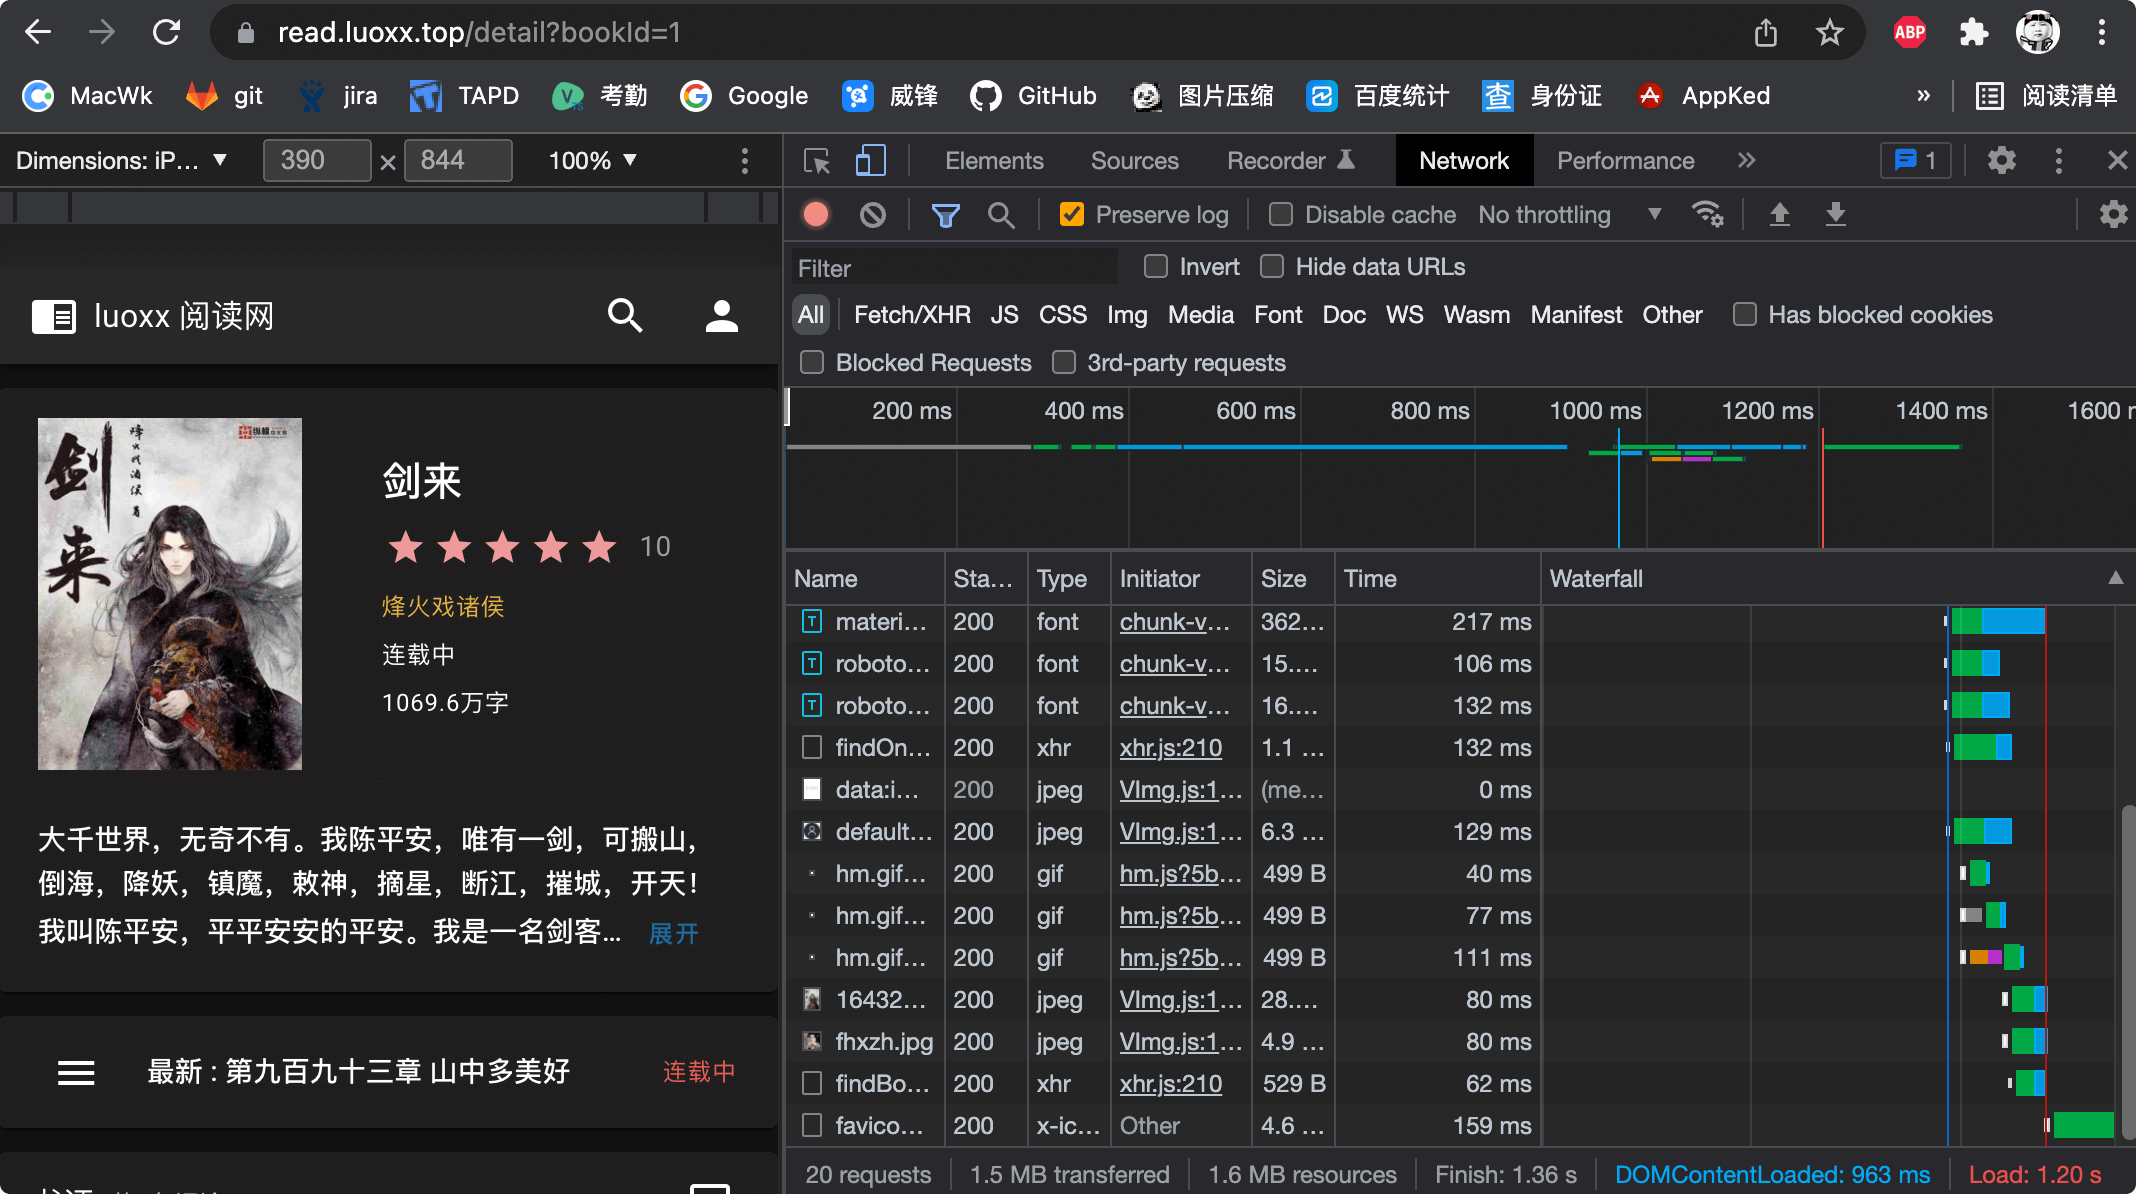
- 直接访问耗时如下(强制清除缓存后重新访问的耗时) 加载完成1.2秒左右
- postman设置为爬虫的ua之后访问,耗时和html结构如下,耗时3.7秒
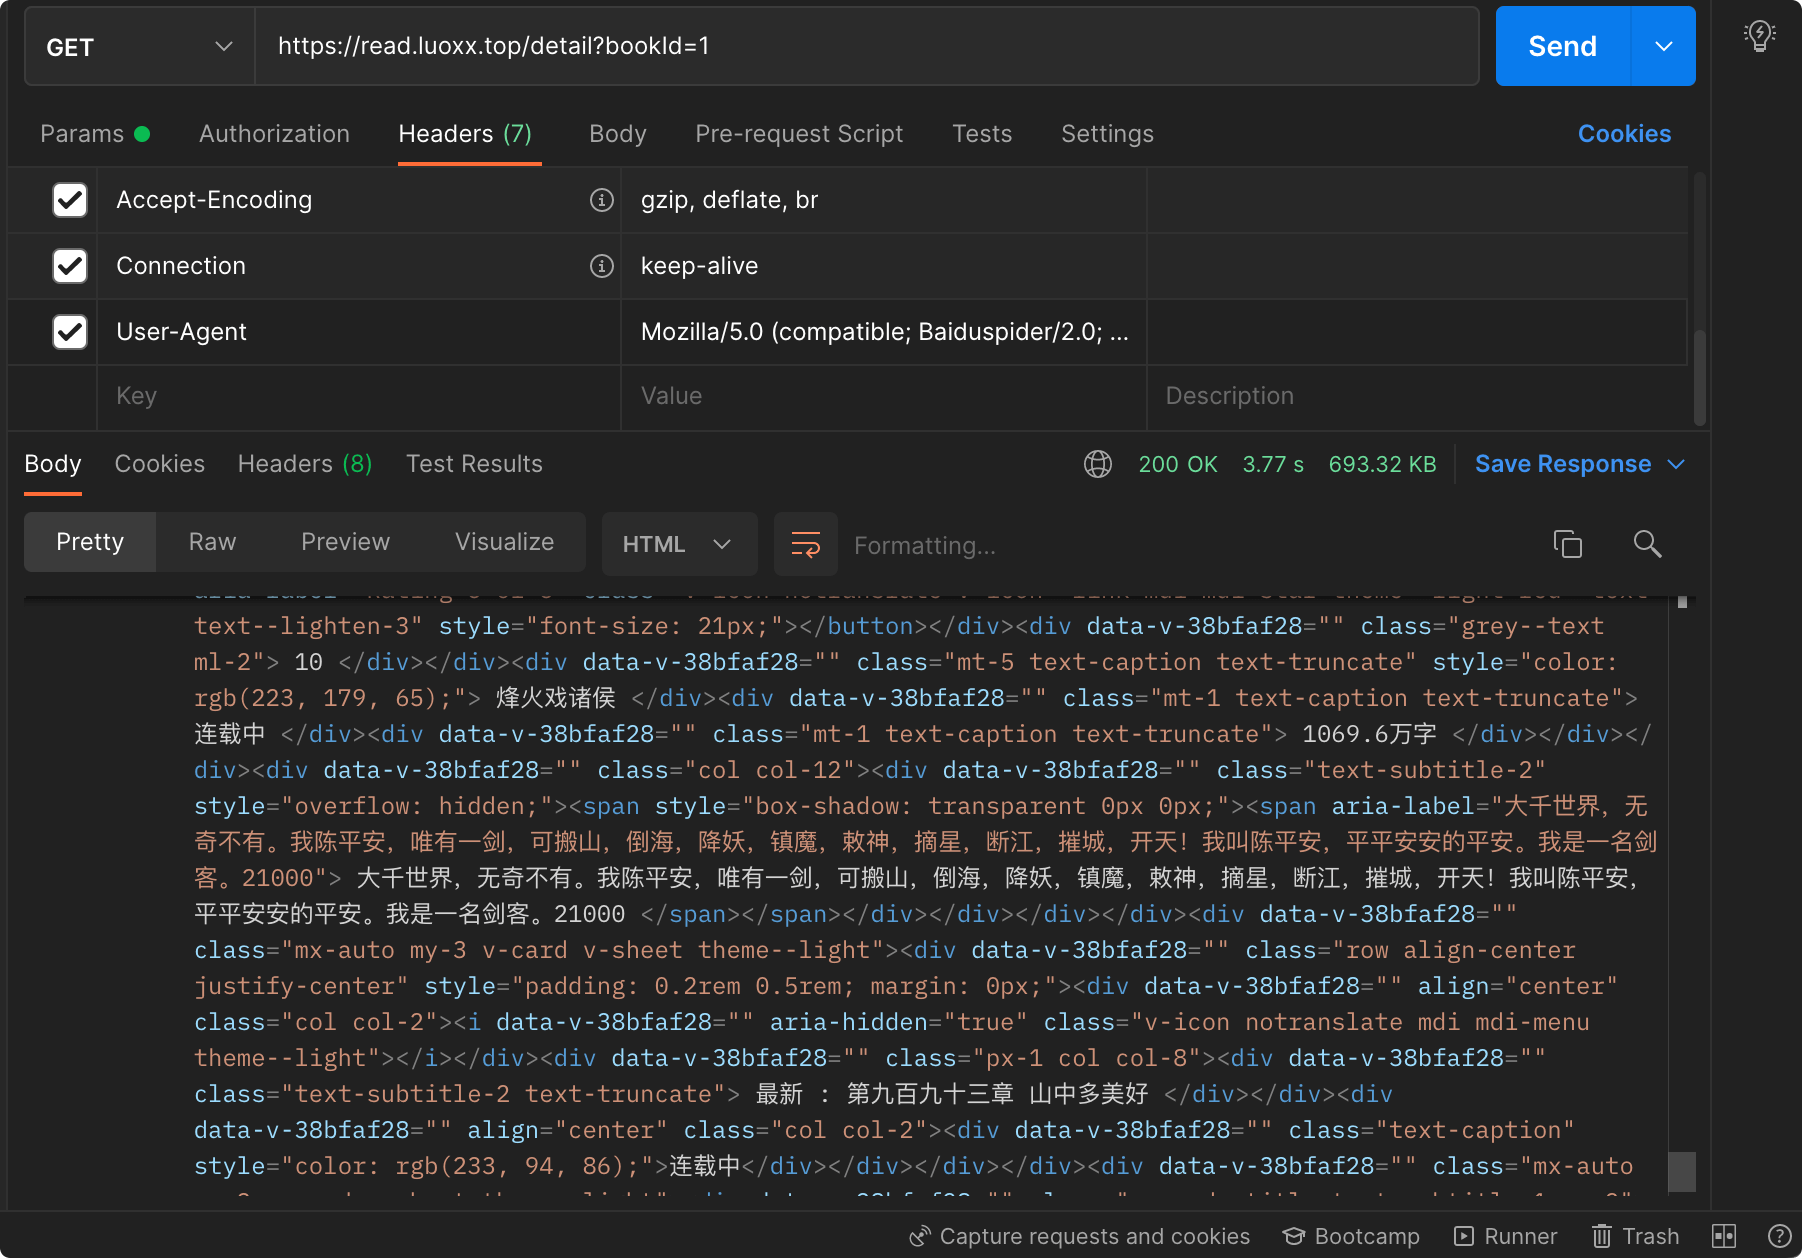
访问明显比直接访问要慢一些,不过也还好,也还在可接受范围内。因为使用了redis缓存,第二次访问就很快了,我这边测试第二次访问时间为900ms左右
踩坑2.0
就在我搭好服务喜滋滋准备被百度收录网页时,突然遇到了服务器内存和cpu飙升以致于直接ssh都连不上,只能重启的情况。
结果多方排查,发现是百度爬虫直接把我服务器给搞挂了,研究nginx日志发现百度爬虫除了一个Baiduspider的ua之外,还会有一个ua名为Baiduspider-render的渲染爬虫会去爬网页的js、css、图片,瞬间几十上百个请求进到了我的node服务,启动了几十上百个chrome标签,分分钟把我的服务器干挂了。
我在网上苦苦搜索了了很久Baiduspider-render相关的信息,也没确定这个渲染爬虫是不是能够直接解析渲染后的spa服务的页面。如果百度爬虫已经能够自己渲染js,也能获取到网页渲染后的内容的话,那我还搭这么个服务纯属没事找事了。但是实在是缺少信息,无法确定不做seo优化百度能不能爬取到内容,所以只能先修改下nginx配置,把Baiduspider-render的请求过滤下,不走node服务,修改后的配置如下:
location ^~ / {
                if ($http_user_agent ~* "Baiduspider/2.0|twitterbot|facebookexternalhit|rogerbot|linkedinbot|embedly|quora link preview|showyoubot|outbrain|pinterest|slackbot|vkShare|W3C_Validator|bingbot|Sosospider|Sogou Pic Spider|Googlebot|360Spider") {
                        proxy_pass  http://127.0.0.1:8327;
                }

                root /opt/webapps/reader_client_8181/;
                index index.html index.htm;
                try_files $uri $uri/ /index.html;
        }
如上,只是把Baiduspider改成了Baiduspider/2.0,因为render的ua是Baiduspider-render/2.0,这样改最简单。


评论区